Words of notice: This is an article has been written by Antoine Cavaillé. Many thanks for their consent to sharing this story here.
Some elements of context
As a Cloud Engineer at Gekko Part of Accenture, I am comfortable running complex infrastructure on AWS which provides datacenters all over the world. But in one project, a customer wished to replicate their infrastructure on a different Cloud provider, Huawei Cloud! I was only aware of the existence of Huawei hardware such as smartphones, computers and IT oriented products but not as a Cloud provider so I decided to share my experience about running an app on Huawei Cloud using as many managed services as possible.
This series will be divided into two parts: this one for the backbone infrastructure and the next will concentrate on Kubernetes and the application.
Here are the components that we are going to setup:
- 1 VPC;
- 1 single subnet across 3 AZs;
- 1 ELB;
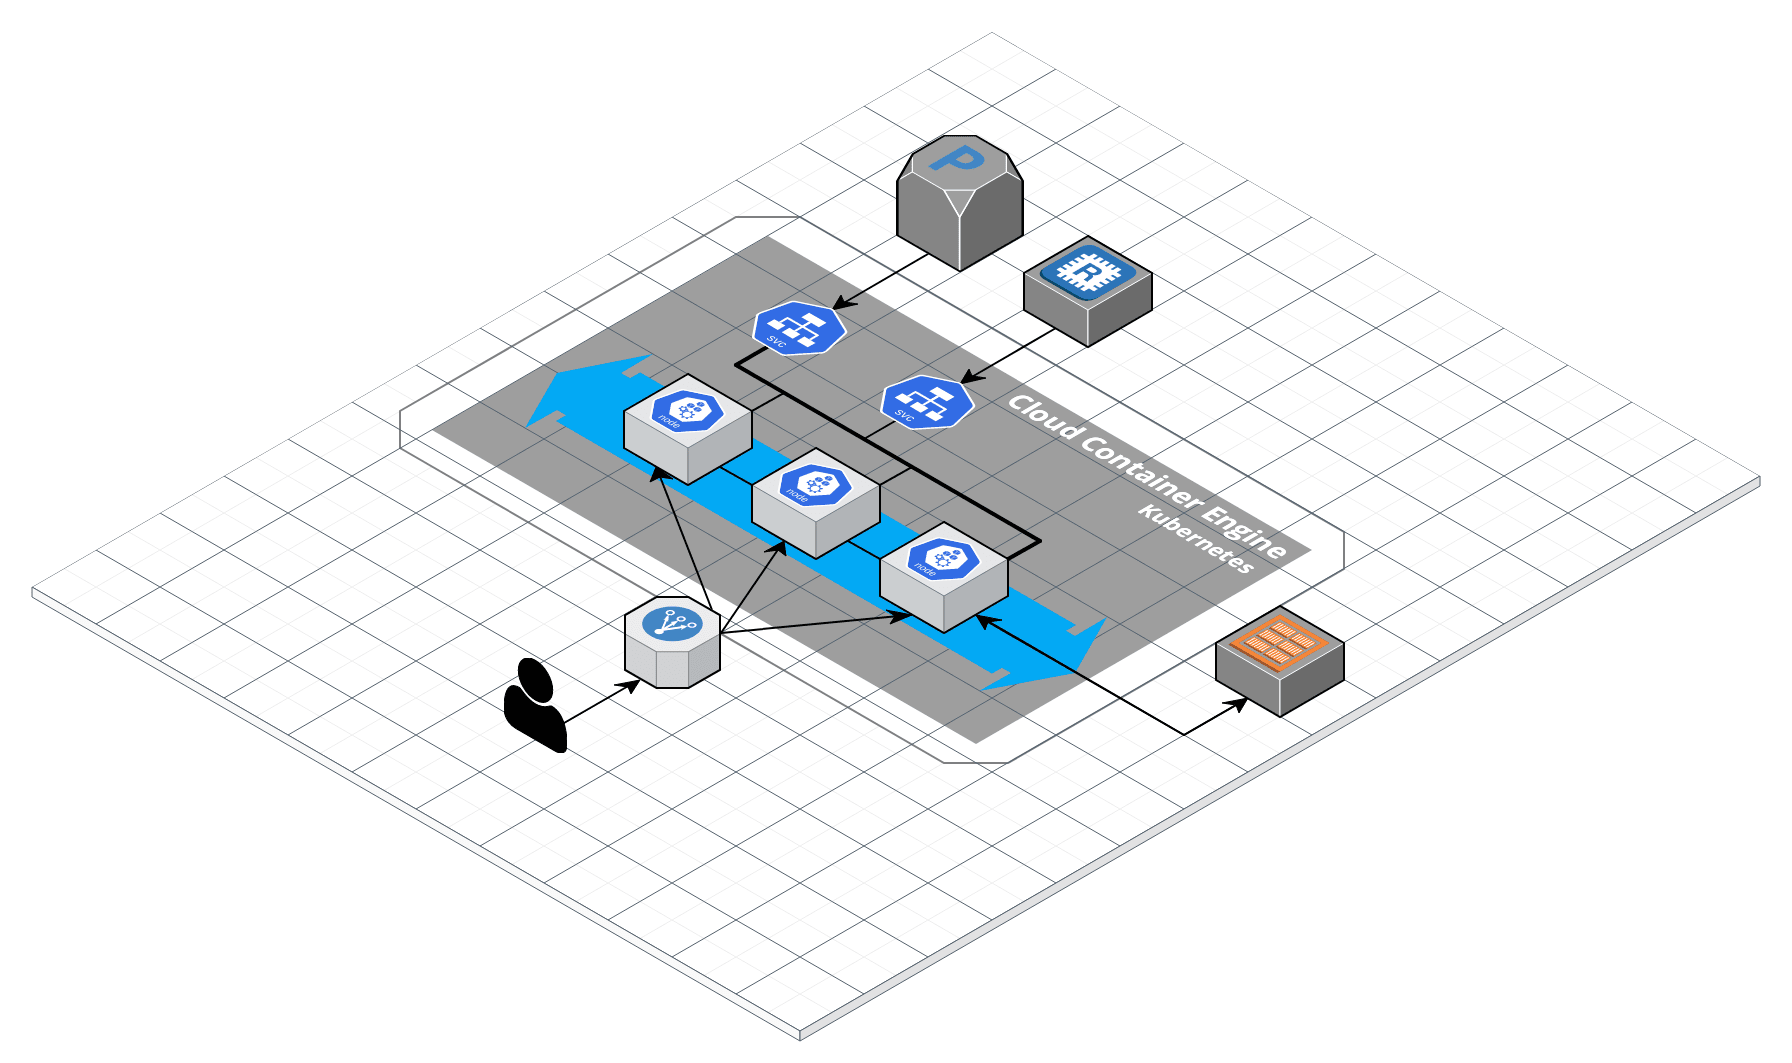
- 1 Kubernetes cluster;
- 1 PostgreSQL database;
- 1 Redis key-value store;
- 1 Docker repository;
- 1 Bastion host;
- Elastic IPs.
Why Huawei Cloud?
In this case the customer deployed a web application on AWS in France. For latency purposes they have decided to deploy the same application on a datacenter in Asia. They were leaning towards Huawei Cloud as it is generally less expensive and contains the managed services they needed for their application to run.
On Infrastructure As Code
In this blog post I will not use Infrastructure As Code -IaC-, everything will be deployed through the web interface, called the Huawei Cloud Console. Nevertheless, there is an actively developed community Terraform provider for Huawei Cloud. All the resources I needed were not available during the course of this project. The first version of the provider has been released the 18th of July, 2018 and it receives frequent updates therefore it is possible the provider could be usable for this project by now!
Here we go!
It is time to build our application step by step. First, we need a Landing zone on our Huawei Cloud account to create the resources needed by our application. We will start by creating a Virtual Private Cloud -VPC- with a single subnet in one Availability Zone -AZ-. Since our VPC is not accessible from the Internet we will create an Elastic Cloud Server -ECS- instance and associate it with a private key and an Elastic IP.
Part 1: The Landing zone
VPC and Subnets
You can create a VPC under Virtual Private Cloud > Buy VPC in the Huawei Cloud Console.
Select a Region, a name for the VPC and a CIDR block. You can use the recommended VPCs to get started faster.
Hint: A /16 at the end of a CIDR block translates to 256 * 256 = 65,536 IP addresses.
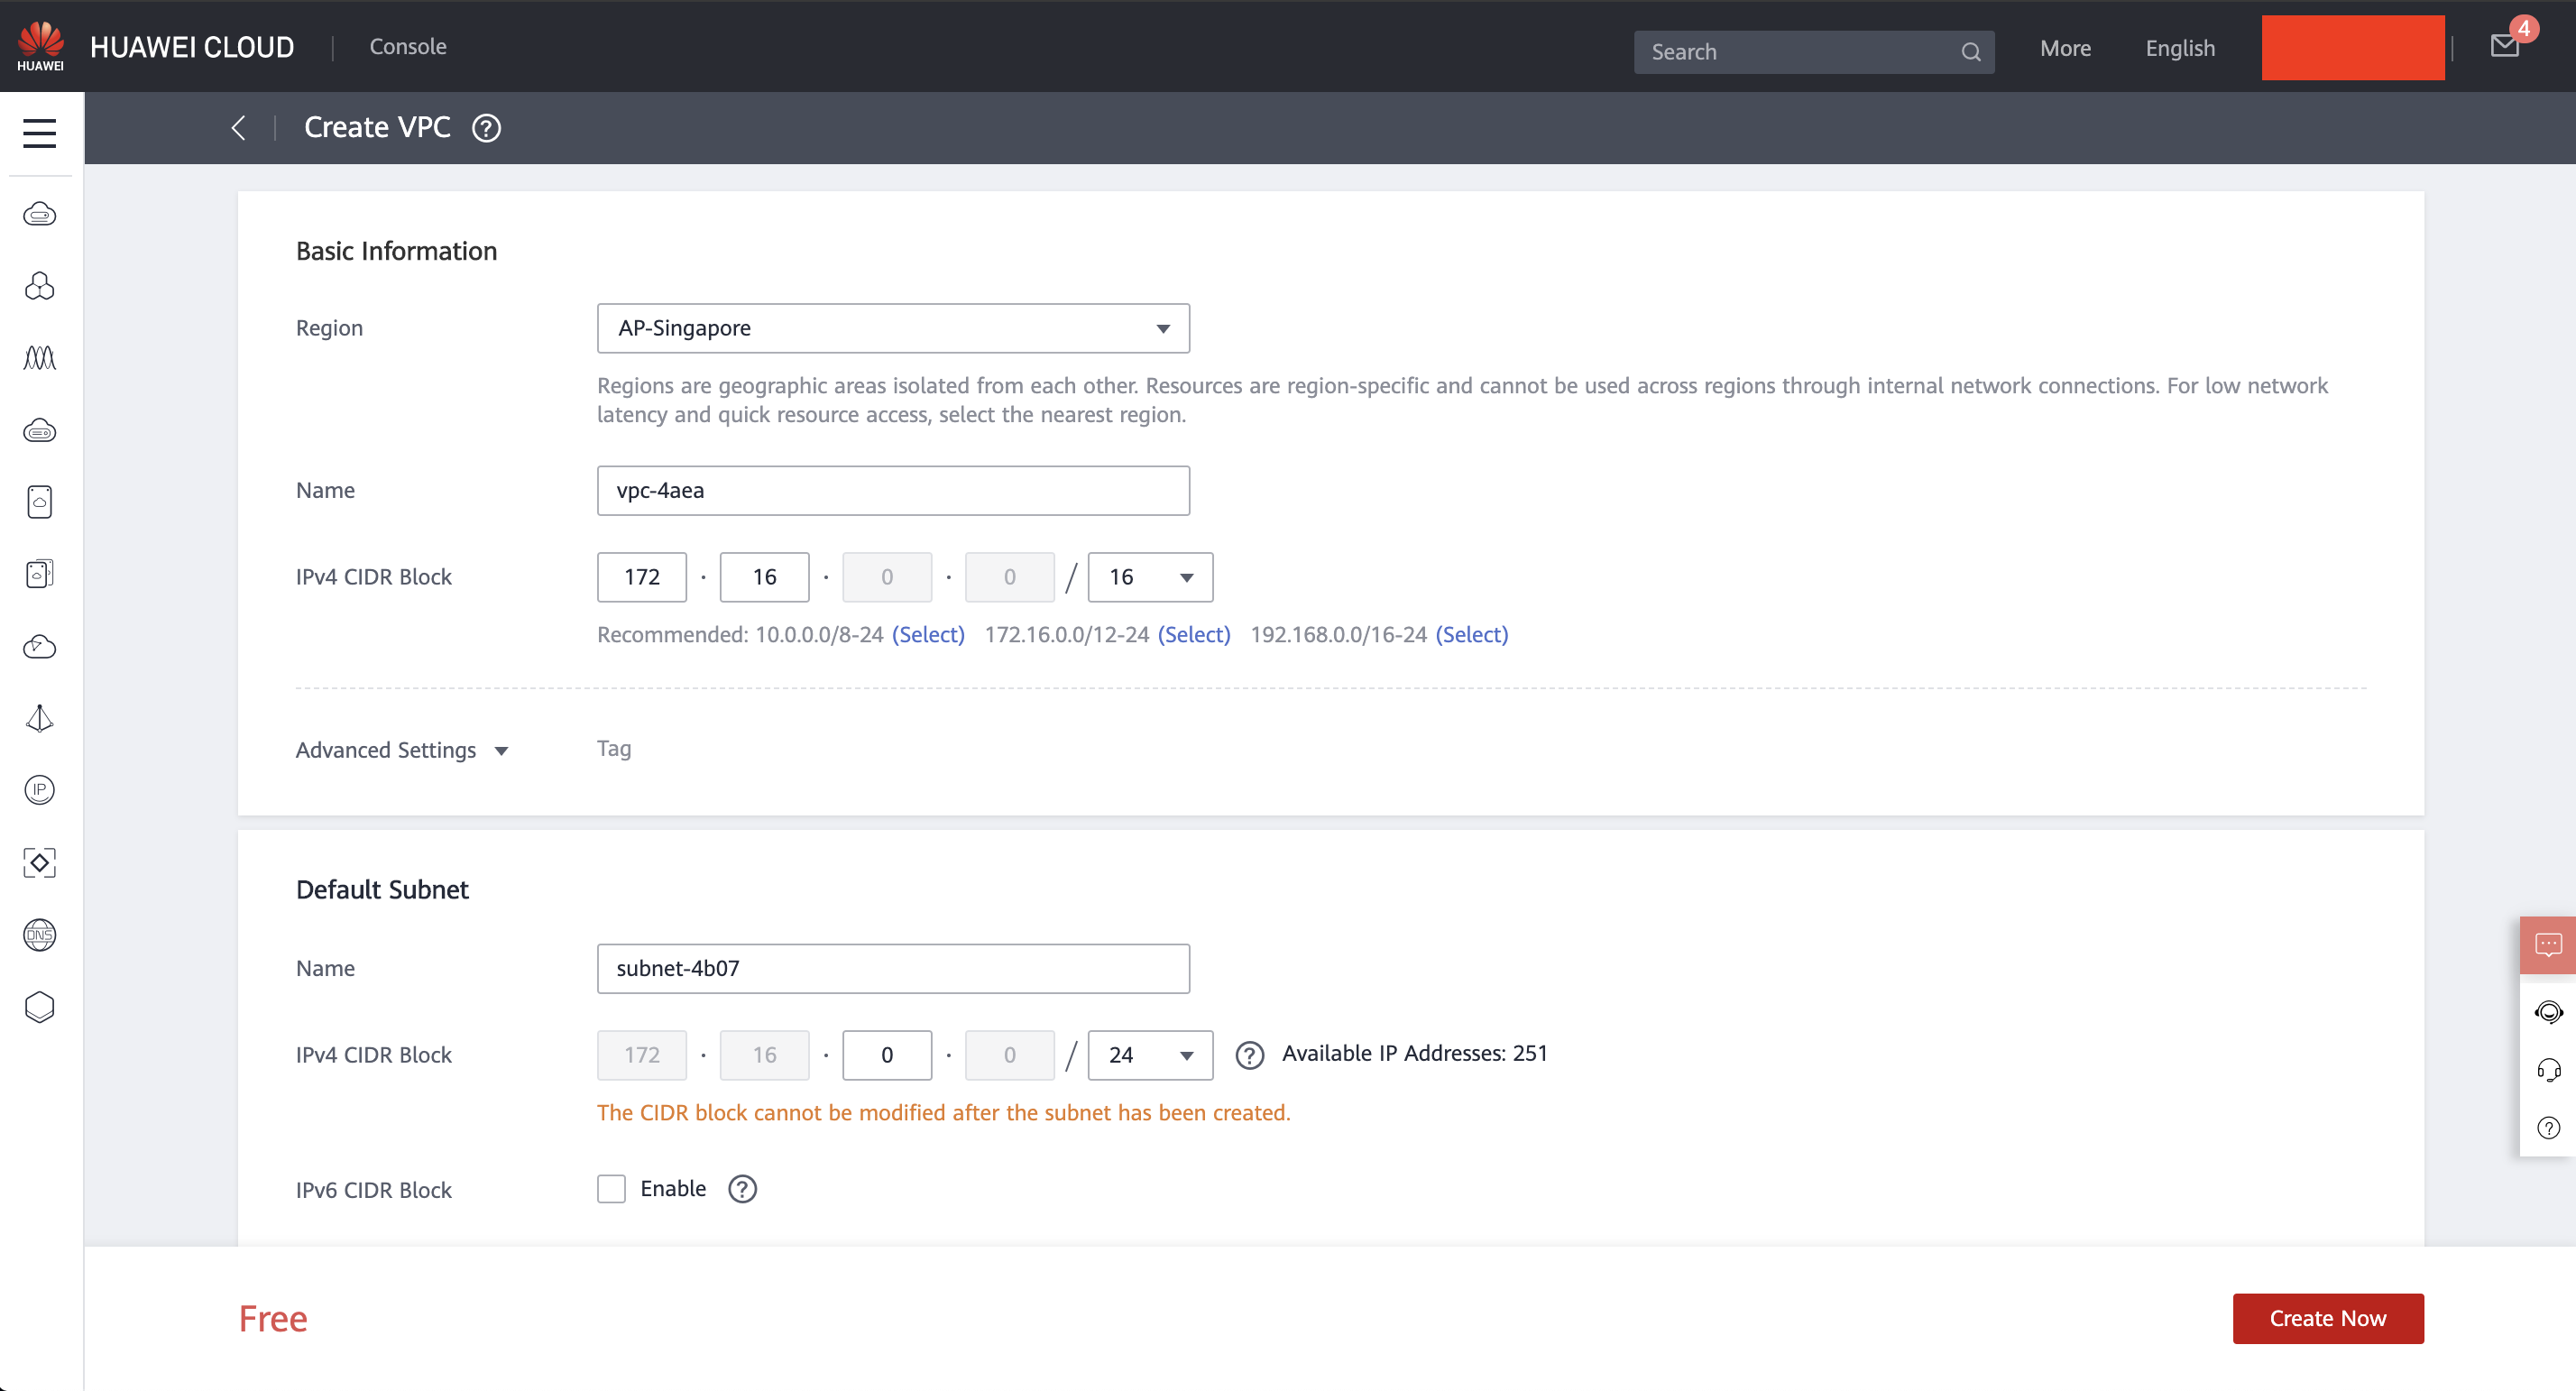
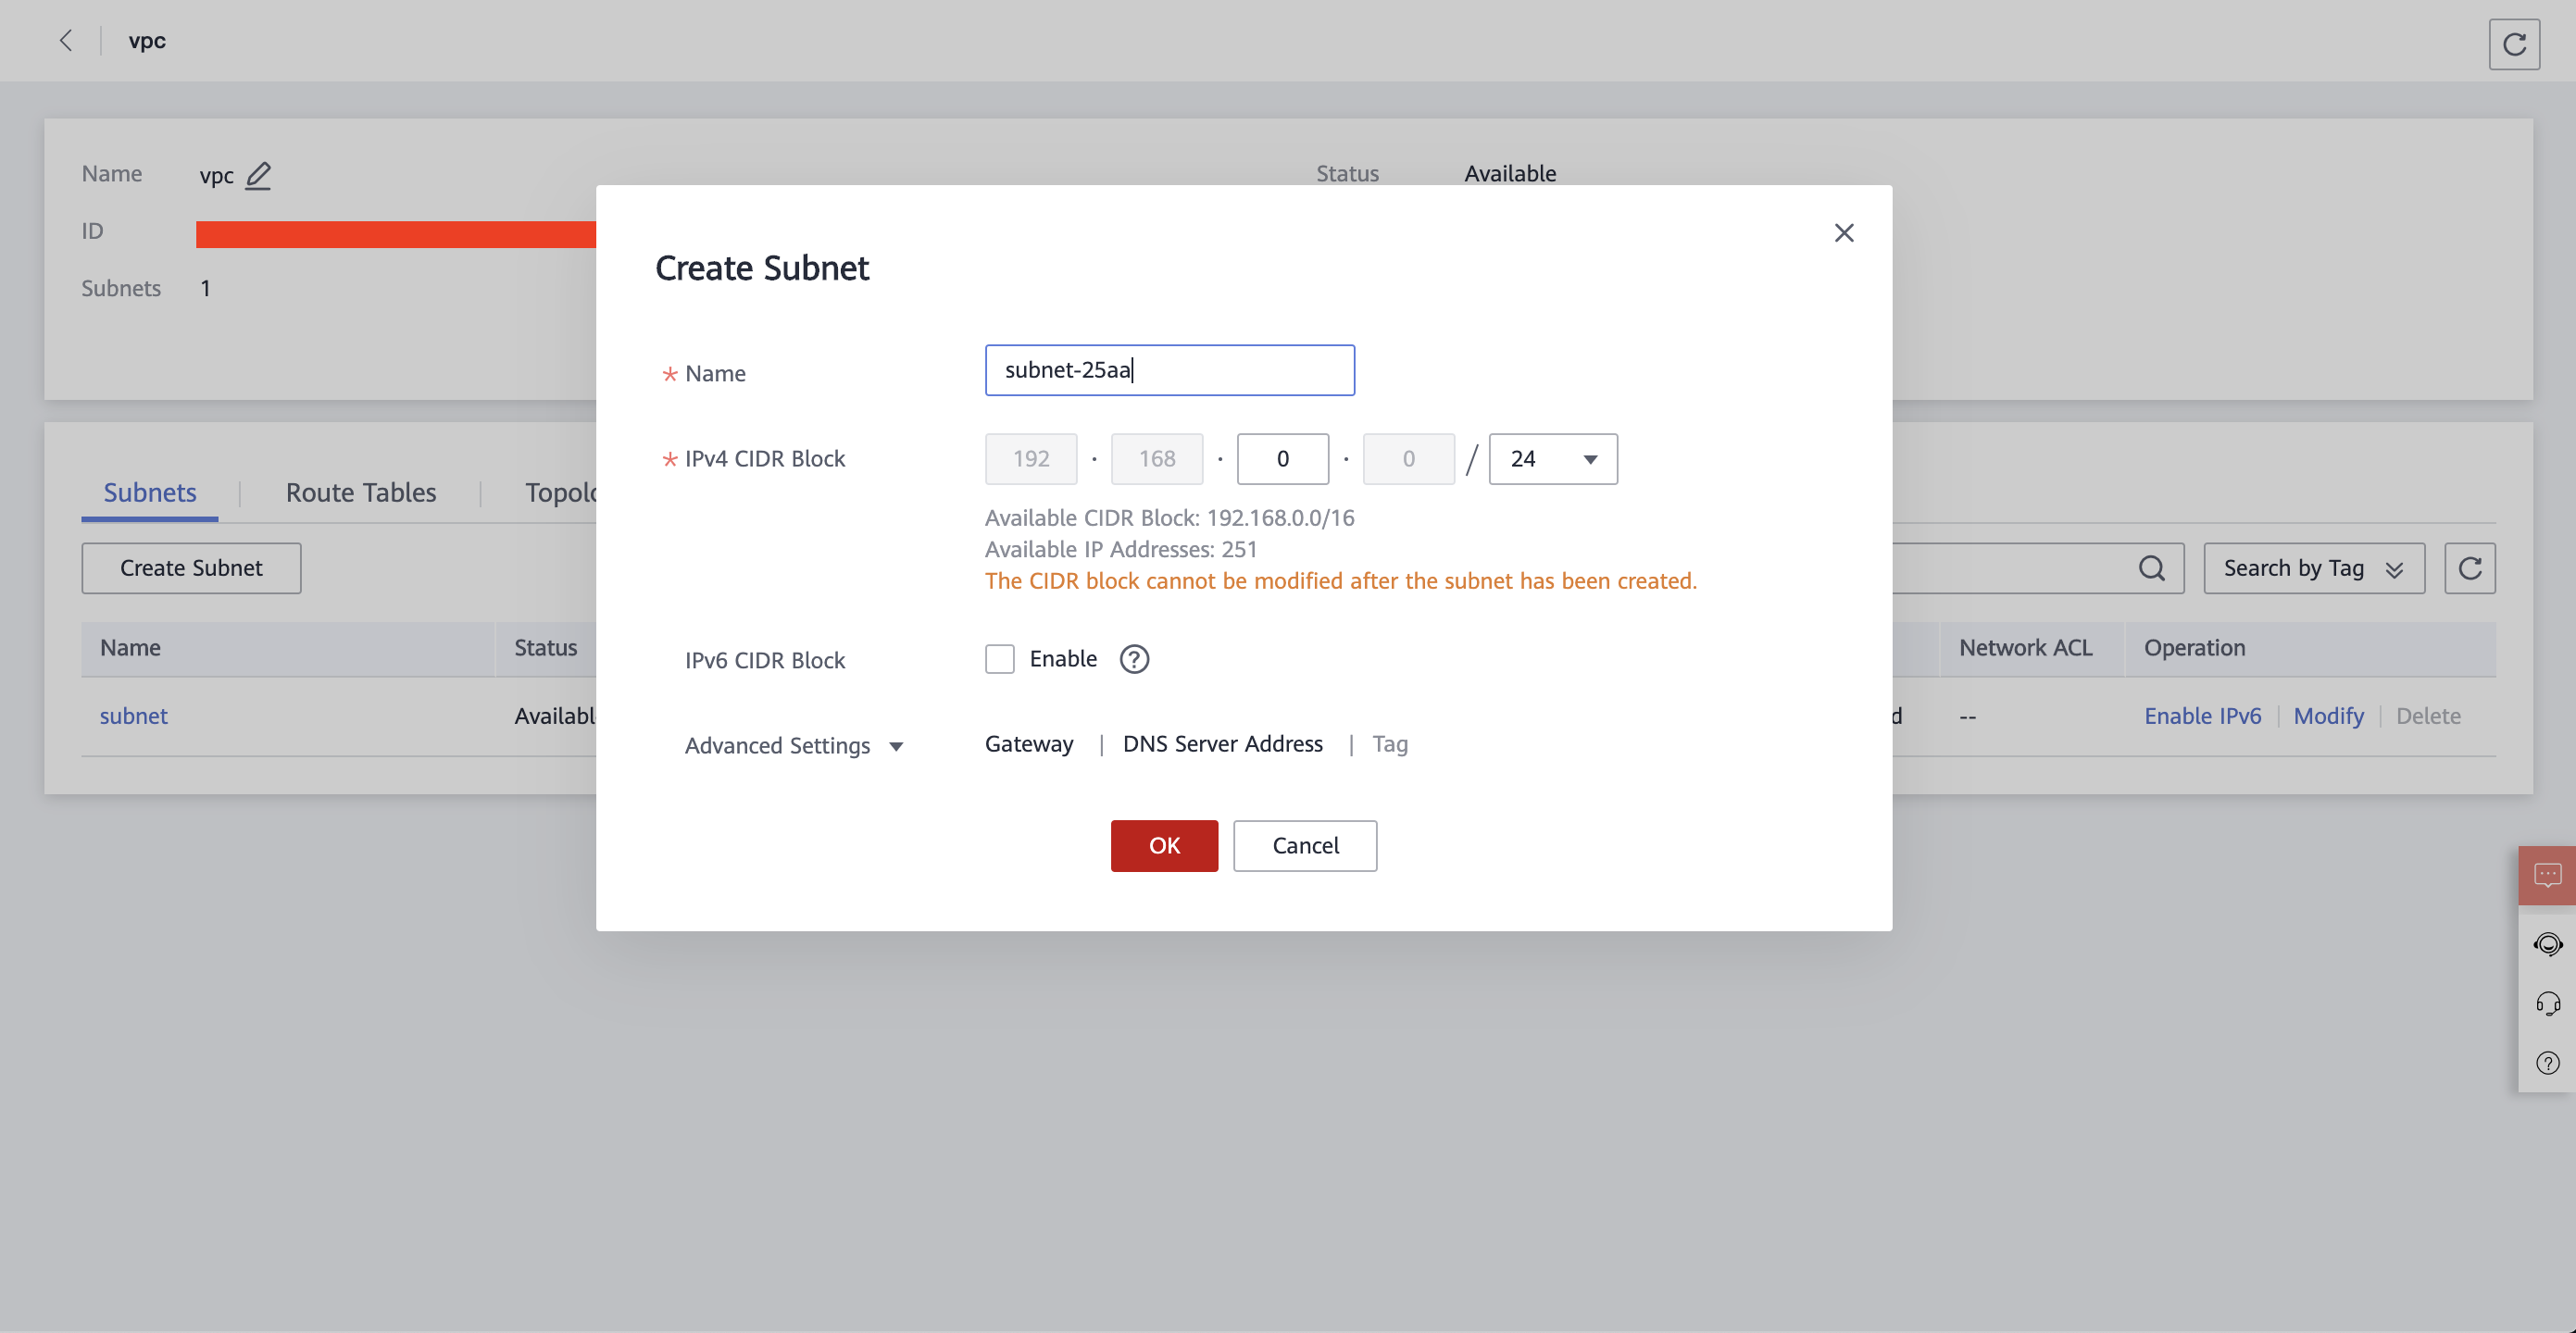
Go to Advanced Settings to create a default subnet.
We choose the default /24 CIDR block allowing us to use 256 IP addresses, which will be sufficient for our future cluster. Keep in mind that it is good practice to split different services onto separate subnets; that is a standard approach to handle security and reliability on Cloud infrastructures.
NAT Gateway
Our infrastructure needs a limited access to the outside world to update itself, etc. There is a service for that in the VPC panel: NAT Gateway, of the Public kind in this case. You only need to create a Public NAT Gateway and attach it to your private subnet. When this step is complete your Kubernetes cluster will be able to reach out the Internet!
Now that we have our first layer up and running we need to have the ability to access it and for that we will use a Bastion host.
Because our VPC is private, it is impossible to directly reach our subnet from the Internet. A bastion is an instance that will allow us to access our private network to operate on the infrastructure.
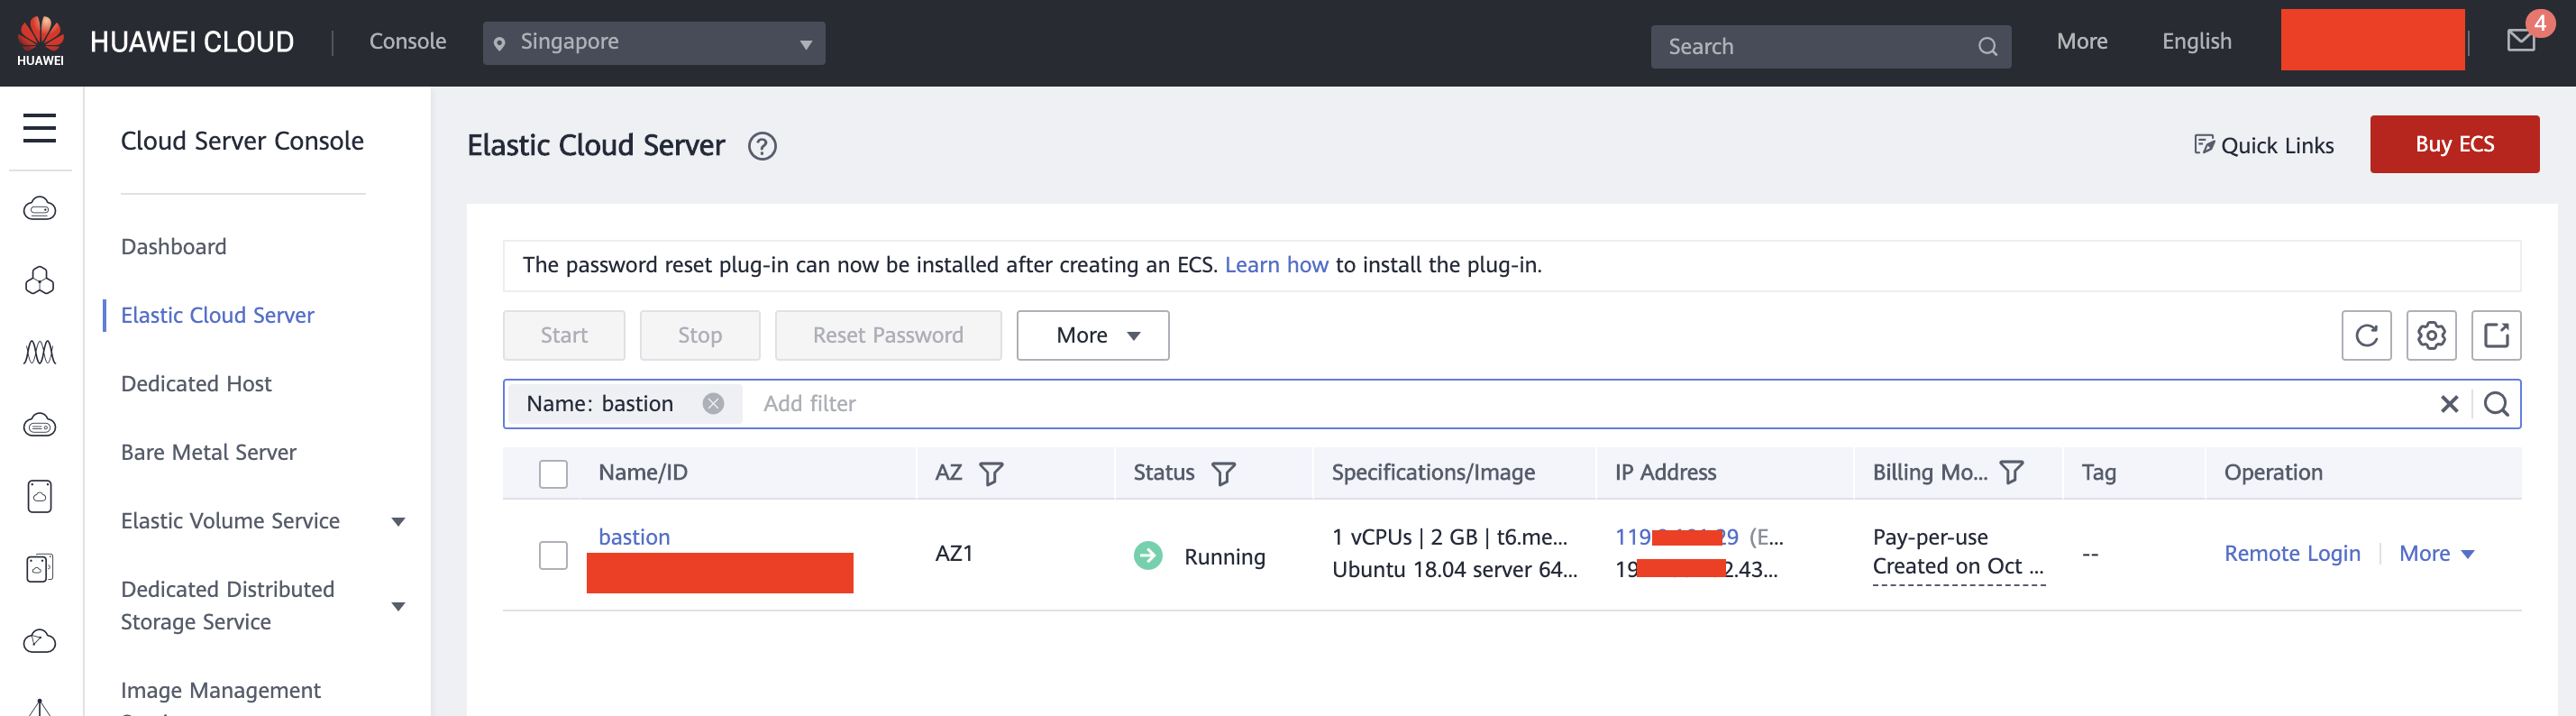
Lets go to the ECS panel to launch our instance.
Bastion
A Bastion is a simple server on our private subnet with an inbound gate to the Internet like a Public IP. With this host, you can access your private VPC.
I will help you understand the different steps needed to create your instance. These are common to many resources so it could be relevant to understand them sooner.
Billing mode:
Yearly or Monthly - It is a way to reserve an instance for a given period of time. This means you will not pay hourly rates as it is common with most Cloud providers but monthly or yearly rates. This is the less expensive way if you can predict the capacity you will need.
On-Demand - This is the default billing mode. Launch an instance and pay by the hour. This option is the best if you need instances for short amounts of time or if you cannot reliably predict the compute capacity you will need. It is the mode we will choose for our Bastion host since it will be shut down after our tests.
Spot price - Cloud providers always have some leftover compute capacity thus they have created the Spot instances mode for that purpose. The price is variable and based on current demand. Let’s say an instance costs a baseline of $0.50 per hour. You could choose to pay $0.20 for this instance and if no one is using it, then it is yours. But if anyone places $0.30 on that same instance or if no more compute capacity is available then it will terminate. This type of billing is useful for preemptible and non-critical jobs for instance, that is jobs that you can interrupt at any time and that are not time-constrained.
Region:
This represents the available geographical locations for your instances. In our case, we will choose “AP-Singapore”.
AZ (Availability Zone):
An AZ is a subdivision of a Region. For reliability purposes a Cloud region is composed of multiple datacenters placed
in the same geographical area. A datacenter corresponds to one AZ. For now we will choose Random since the location of
the Bastion is not important here.
CPU Architecture:
x86 is the historical platform for server computing. More and more workloads tend to natively support or to migrate to the more efficient ARM instruction sets. Huawei Cloud gives the choice between Intel x86 and home-made Kunpeng ARM processors. We will stick with Intel x86.
Flavor type:
This is where you customize your instance. Select the optimal CPU capacity, RAM capacity and Price for your application. You will have the choice between compute-optimized instances, memory-optimized instances, general purpose instances, etc. For us, a general purpose T6 instance with 1 vCPU and 2GB of RAM will do since it will be used to access other resources and for maintenance purposes.
Security Group:
Security groups contain inbound and outbound stateful network rules to secure your instance. This implies that any request which passes though your security group will be checked once and only once and if any rule matches the request, it and its response may be allowed to pass through. Security groups may be attached to one or multiple instances.
By default, no one is allowed to talk to your instance; you will need to grant inbound accesses. For SSH, add an inbound rule opening port 22 to your IP. That is roughly the configuration of the default security group.
EIP:
You can attach static IP addresses to your instances to make them addressable from the Internet. Use the lowest values for your Bastion host.
ECS Name:
The name of your instance on the Huawei Cloud Console.
Now that all these steps are handled, hit create!
Part 2: PostgreSQL database
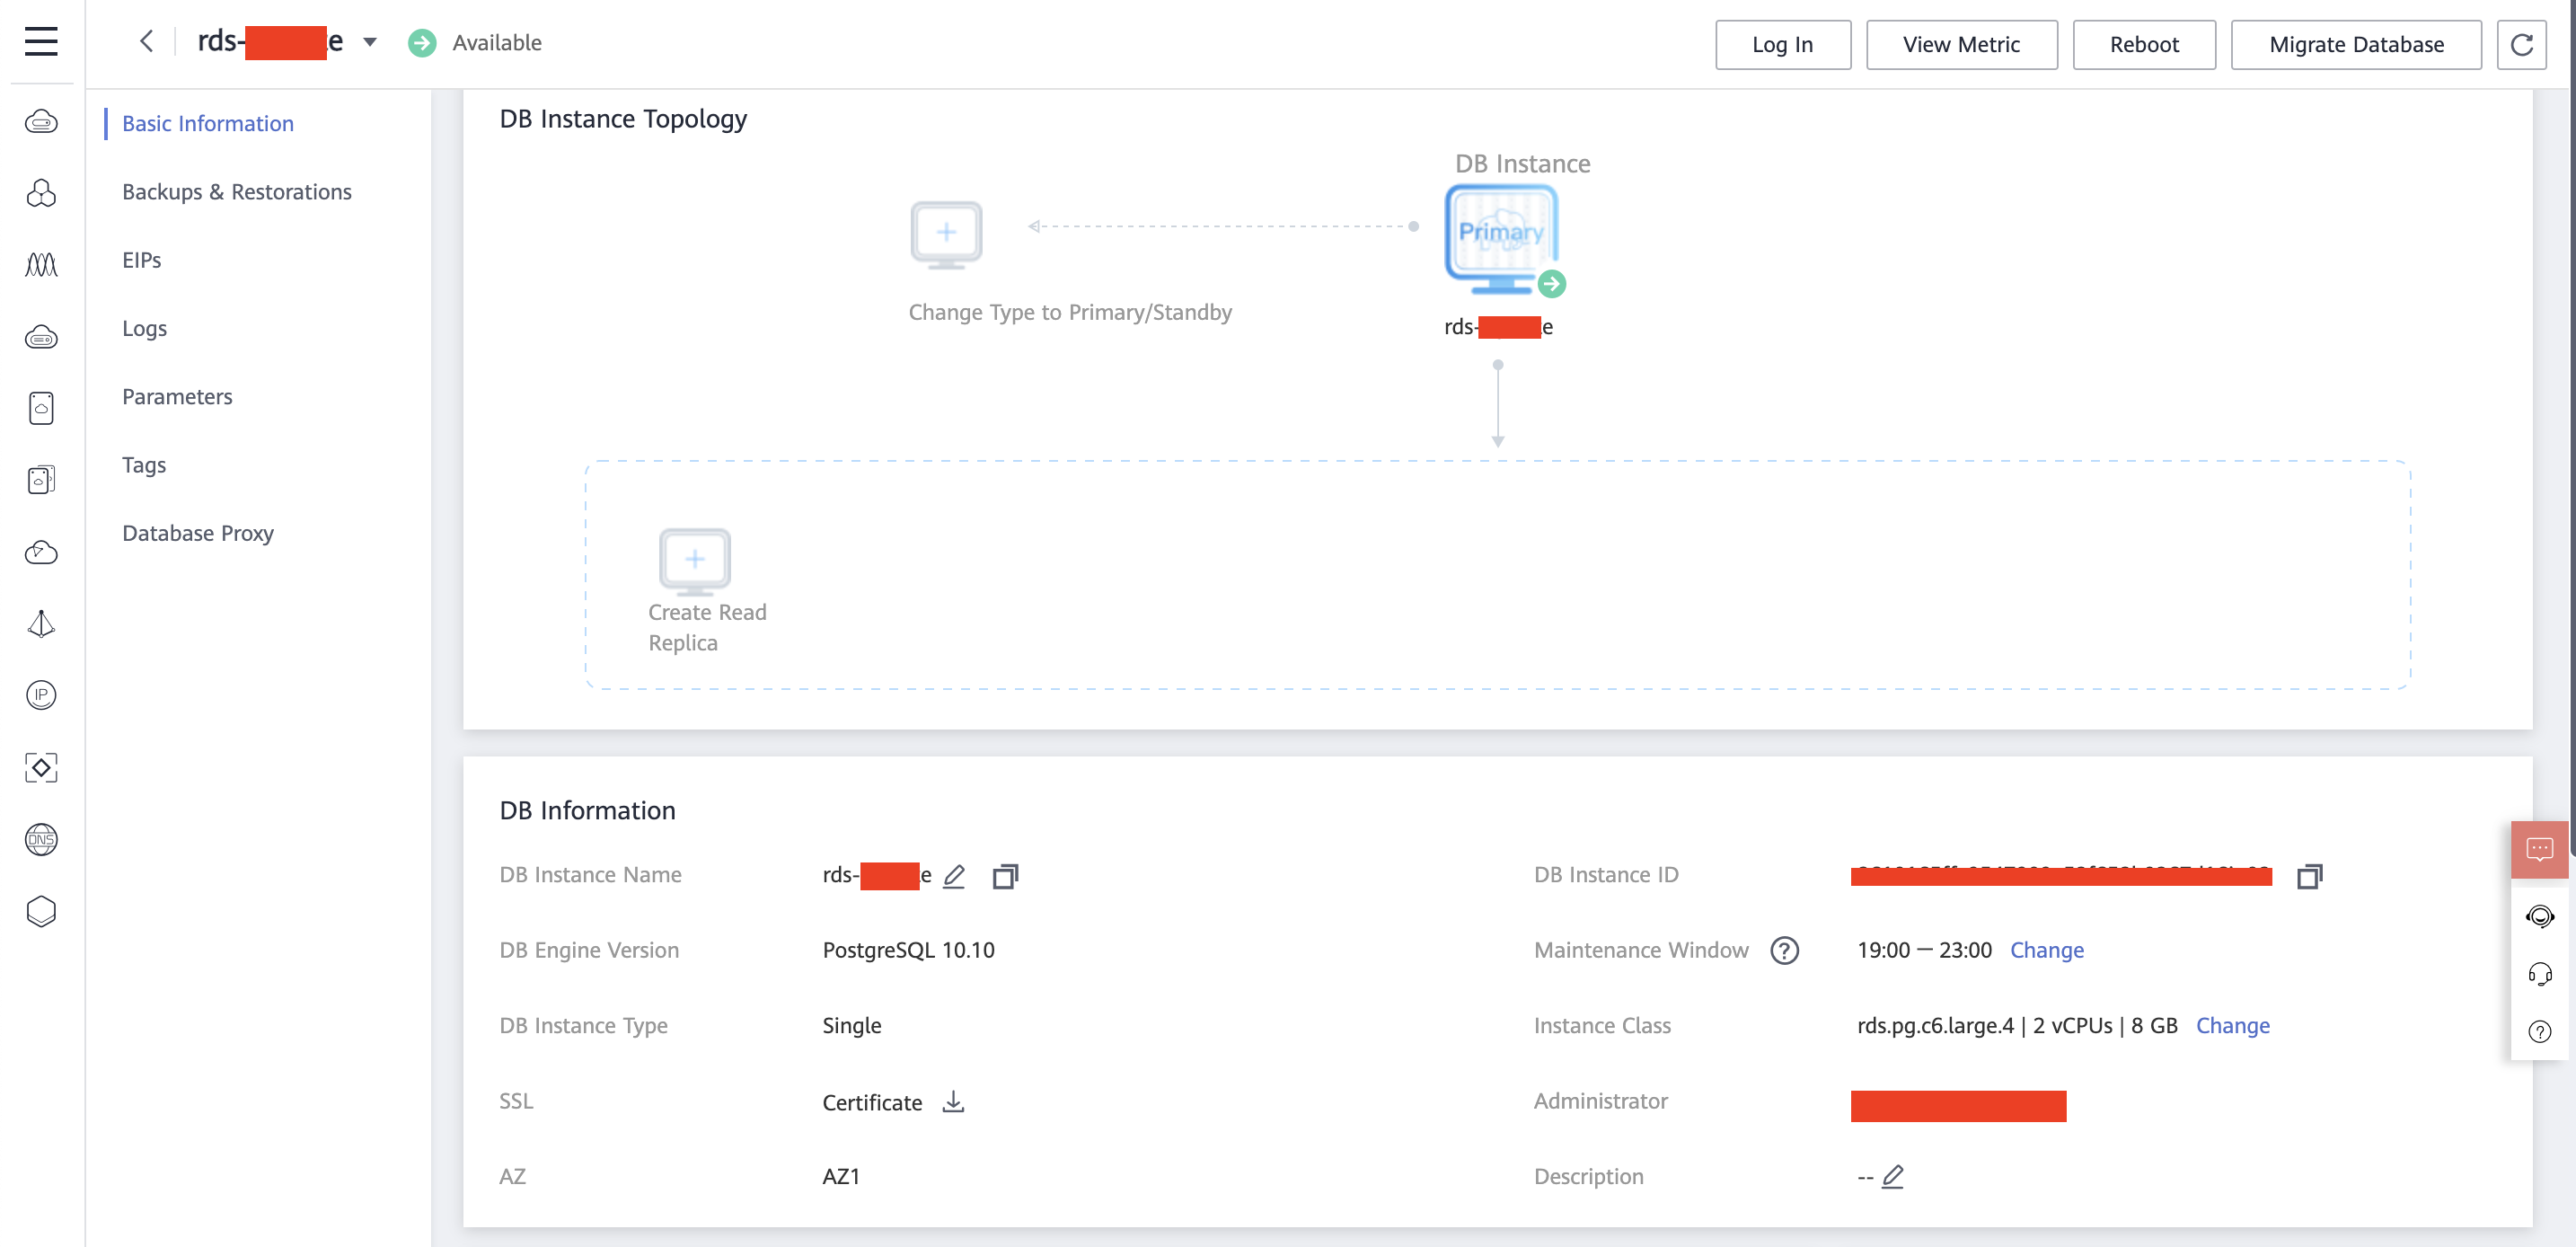
Our application needs a managed relational database. For that matter, Huawei Cloud offers RDS, a service flavored for each supported database engine. By clicking the RDS service then “Buy DB instance”, you can create a new managed PostgreSQL database.
We will deploy PostgreSQL 11 in Singapore and use the “Pay-per-use” billing mode. RDS is quite customizable; there are 3 database engines to choose from (MySQL, PostgreSQL and Microsoft SQL Server), Active-Passive High-availability -failover database-, Read replicas, instance type, storage capacity, AZ, etc.
When the database instance is up and running, select it in the Console to familiarize yourself with the interface. You can trigger a failover by using the Primary/Standby button, dynamically scale your storage and retrieve the connection information for your database.
Part 3: Redis
Key-value stores are a great way to keep around data generated from time-consuming operations and reduce load on your compute layer, your underlying database, your network, etc. This need can be covered by DCS.
Again, when you click the “Buy DCS instance” button you will see a few settings to customize your key-value store, of which:
- Cache engine: Redis or Memcached;
- Instance performance;
- Number of replicas;
- Node sharding.
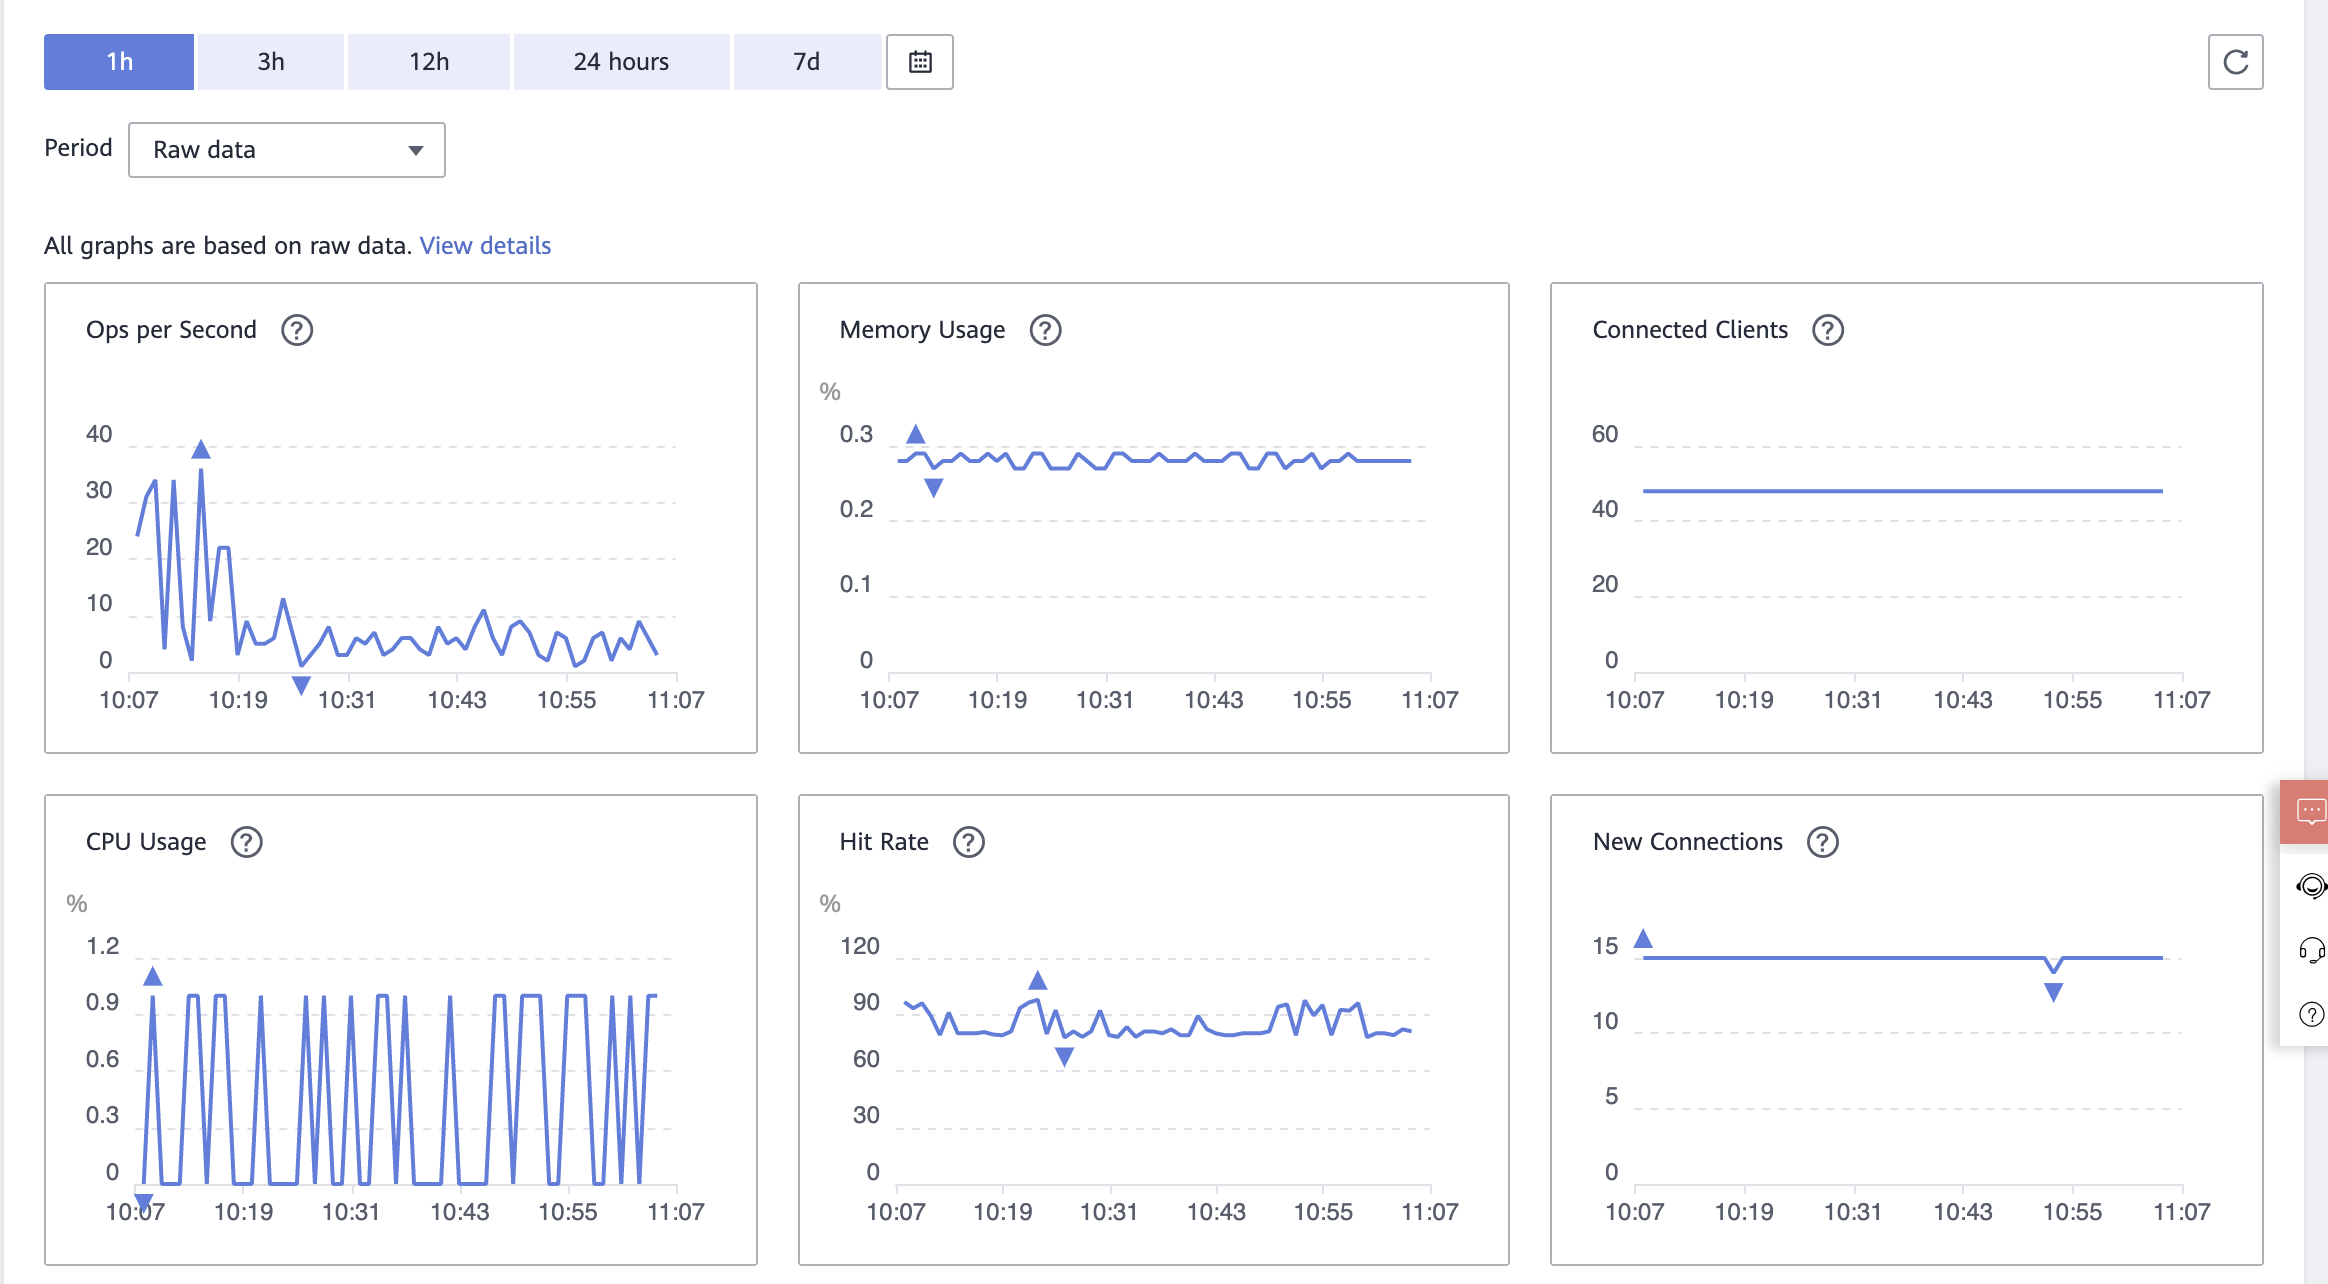
When your cluster is up and running you can click on it and select “Performance Monitoring”. This dashboard gives a better understanding of what is happening on your new Redis cluster.
Part 4: Load Balancer
It is soon time for the Kubernetes cluster. That means our application will be available to our customers and receive network traffic. The best way to “open” our platform, which runs on a private network as stated previously, is to connect it to a load balancer. This component will create a bridge between the external world and our infrastructure!
There are 2 types of load balancers in Huawei Cloud:
- Dedicated: Ensures that the traffic passes through dedicated resources, thus bringing better performance. It is more customizable and can be deployed across multiple AZs;
- Shared: Their resources are not guaranteed, that is they are shared with other deployed load balancers. Shared load balancers are provided free of charge.
We will deploy a Shared load balancer. The service page presents several options such as:
- The IP address to bind the load balancer to;
- The billing mode:
Bandwithfor stable heavy traffic orTrafficfor light or spiked traffic; - The bandwidth: 5Mbps to 2Gbps for Bandwidth mode or 1Mbps to 300Mbps for Traffic mode.
We would like users to access our applications deployed on Kubernetes. For that, we have multiple solutions to link our load balancer to our workloads:
-
Creating a Service configuration directly from the CCE panel, under
Resource Managment > Network > Services. From there, we can choose an existing load balancer. This is the easier way to do it because your Kubernetes resources will automatically create listeners on your load balancer and deploy the related resources inside your cluster. Unfortunately, at the time of writing it is not possible to deploy your workloads from a YAML configuration or Helm charts; -
Through the CLI but it can link any workload to your load balancers. You will have to manually edit your ingress controller service to fill the
kubernetes.io/elb.*annotations with the load balancer information; -
Soon there will be a third method based on custom annotations, just like service.beta.kubernetes.io/aws-load-balancer for AWS.
Congratulations, your application is ready to onboard its first Kubernetes pods and run entirely on Huawei Cloud managed services! In the next part, we will present the managed solution to run your application on a Huawei Cloud Kubernetes cluster.